Montage Shortcuts are the principal objects within a Montage Desktop window.
Similar in a number of respects to Windows shortcuts (aka links)
on the Windows desktop, Montage Shortcuts have icons and
titles representing documents and
executable programs that can be opened or launched by double-clicking.
Just as one uses
Windows Explorer to
manipulate Windows shortcuts, you can use Montage to arrange, move, and copy
Montage Shortcuts by dragging and dropping, right-click to invoke the Shortcut context menu,
or
open a Shortcut Properties dialog. Also,
the global Shortcuts dialog allows you to
perform actions and control options affecting all Shortcuts within a montage.
Shortcuts can be created either via the New Shortcut
command or by dragging and
dropping files, folders, links, and hyperlinks
from Explorer, or from another
instance of Montage. While Shortcuts are similar to their
familiar Windows counterparts, there are a number of fundamental differences
between Montage Shortcuts and Windows links. For example, Shortcuts
support unique monitoring and highlighting features,
and whatever Shortcut changes you make are
saved and restored from the montage that contains them.
Tip: "Shortcut"
(with a capital "S") always refers to a Montage Shortcut, as opposed
to a Windows "shortcut" (lower case), for which the preferred
terminology is a "link". Similarly "Desktop", with a
capital "D", refers to a Montage main window, whereas "desktop"
in lower case means the Windows desktop.
A "standard" Montage Shortcut has an icon, and below it a title
consisting of one or more lines of text, similar in appearance to what you might
see in Explorer's "Large
Icons" view mode. When you
move a Shortcut by dragging it across the Desktop, the icon and title move
together. Also, as with a Windows link, a Shortcut can be
selected by clicking on it,
it displays a Shortcut tip when
you hover the mouse over it, and you can edit the title in place.
An alternative style of Shortcuts is available for use in graphical
montages, where the Montage Desktop contains a background image (wallpaper)
over which "transparent" Shortcuts are superimposed. To maximize
background visibility, transparent Shortcuts have no icon and avoid the standard
opaque highlighting modes, using a different, but functionally equivalent
scheme. Options are provided to control the degree of visibility of
transparent Shortcuts, ranging from being completely hidden to being visible at
all times, by virtue of displaying their borders and/or titles. The color
of Shortcut titles and borders is user-selectable, to assure good contrast
against the chosen wallpaper. When borders or titles are hidden, a handy
mouse-over
option (Shift+F4) highlights each Shortcut as the mouse passes over it, so it behaves
like an invisible "hot spot" on the background graphic.
Montage supports a number of standard and transparent highlighting modes to indicate each
Shortcut's
current status. (Also see the Miscellaneous,
Standard
Style and Graphical Style commands
for more about settings pertaining to these modes.) Shortcut highlighting relates to the following aspects, which may occur
in various combinations:
-
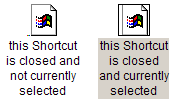 Selection Selection
When a standard style Shortcut has been selected, e.g. by clicking on it, the title's
background changes to gray, and a 1-pixel border appears around its
icon. For unselected Shortcuts, the title assumes the
Desktop's background color, and there is no extra border around the icon.
 For
the transparent style of Shortcuts, selection is indicated by a second, thin
border, just within the Shortcut's outer border. (The outer border for
closed Shortcuts is governed by the
Show Borders
option.) The inner border
always has the same color as the title (if there is any title text, which is
optional), whereas
the outer border color depends on whether the Shortcut is open, and its
current
zoom state. When the Shortcut is closed, the outer border (if
shown) also has the same color as the title text. For
the transparent style of Shortcuts, selection is indicated by a second, thin
border, just within the Shortcut's outer border. (The outer border for
closed Shortcuts is governed by the
Show Borders
option.) The inner border
always has the same color as the title (if there is any title text, which is
optional), whereas
the outer border color depends on whether the Shortcut is open, and its
current
zoom state. When the Shortcut is closed, the outer border (if
shown) also has the same color as the title text.
-
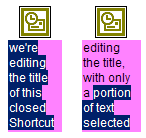 Edit mode Edit mode
Clicking once on the title of a selected standard Shortcut puts you into title
editing mode, as indicated by a purple background color for the title
area. The entire title is initially selected, with reverse video and a
dark blue background on the selected text. Note that an editing
context menu is available in this mode. Clicking outside of the title
area exits from edit mode, whereupon the title reverts to its normal
appearance.
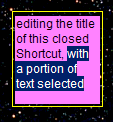 In-place
editing of transparent Shortcuts uses a similar mode of highlighting to
that for standard Shortcuts, i.e. purple background, reverse video, and dark
blue for the selected text. Normally, however, it is more convenient
to disable the feature of automatically entering into edit mode when you
click on the title area of a selected transparent Shortcut, because there is
no separate icon to click on when you don't want to edit the
title. Instead, you can enter into edit mode via the Rename
command of the Shortcut's context menu, or use the Shortcut Properties
dialog. In-place
editing of transparent Shortcuts uses a similar mode of highlighting to
that for standard Shortcuts, i.e. purple background, reverse video, and dark
blue for the selected text. Normally, however, it is more convenient
to disable the feature of automatically entering into edit mode when you
click on the title area of a selected transparent Shortcut, because there is
no separate icon to click on when you don't want to edit the
title. Instead, you can enter into edit mode via the Rename
command of the Shortcut's context menu, or use the Shortcut Properties
dialog.
Tip: Use
Style, Edit on Click in the
global Shortcuts dialog to
enable or disable in-place editing according to your own preference.
-
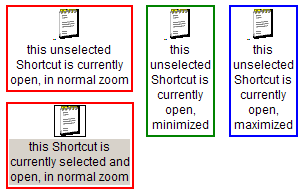 Opening
and zoom state Opening
and zoom state
After launching a Shortcut, e.g. by double-clicking on its icon, Montage
detects and monitors the state of its associated target
window, with the help of a built-in timer. Upon detection, a colored border or box is
displayed around the Shortcut, with the color indicating one of three
possible zoom states: normal
(red), minimized (green), or maximized (blue). When the application
window is closed, the outer border highlighting disappears (unless the
Show Borders
option is turned ON).
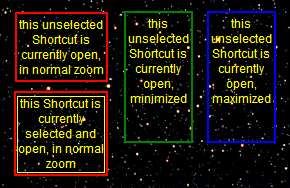 The
same colored border highlighting conventions apply to transparent
Shortcuts. It also
is sometimes useful to display a thinner
border (of user selectable color) around each closed transparent Shortcut,
especially when Shortcuts have no title text. In the examples on this page,
we've chosen yellow as the default color for transparent Shortcuts, to stand
out against the black background. The
same colored border highlighting conventions apply to transparent
Shortcuts. It also
is sometimes useful to display a thinner
border (of user selectable color) around each closed transparent Shortcut,
especially when Shortcuts have no title text. In the examples on this page,
we've chosen yellow as the default color for transparent Shortcuts, to stand
out against the black background.
-
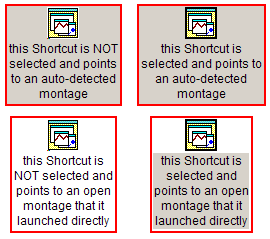 Auto-detection Auto-detection
In certain cases, Montage will detect that an application or document has
already been opened, even though it was not launched through this
Shortcut. This auto-detection
behavior, controlled by the global
Auto-Detect option, applies to Shortcuts that point to other montages,
whose openings are automatically detected. For Word documents,
Montage employs lazy
auto-detection, where the fact that the document already happens to
be open is not recognized until you attempt to launch it. In either
case, the auto-detected mode for standard Shortcuts is indicated by a gray background color
encompassing both the icon and the title. As with normal openings, the
current zoom state is indicated
by the color of the surrounding border, and the target
application window can be controlled directly via the Shortcut
context menu. In cases of auto-detection, however, the target is
not closed automatically, except by closing the parent
montage that actually launched it.
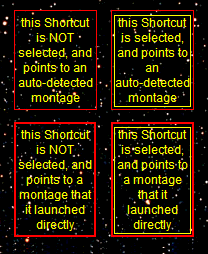 For
transparent Shortcuts, where opaque highlighting modes are to be avoided,
the difference between normal and auto-detected cases is discernable by the
width of the colored outer border. A thin (1 pixel) outer border (red,
green, or blue) indicates auto-detection. The thicker (2 pixel) border
indicates a normal opening, i.e. launched by this Shortcut. For
transparent Shortcuts, where opaque highlighting modes are to be avoided,
the difference between normal and auto-detected cases is discernable by the
width of the colored outer border. A thin (1 pixel) outer border (red,
green, or blue) indicates auto-detection. The thicker (2 pixel) border
indicates a normal opening, i.e. launched by this Shortcut.
|
|
You can drag and drop
Shortcuts into or out of Montage from or to another Windows application, or between two different instances of Montage.
Either the left or the right mouse button works in conjunction
with a drag-and-drop; when using the right mouse button, a context
menu appears upon releasing the mouse button (the drop), giving you an
opportunity to choose an action or cancel the operation. (Also see more about
drag and drop issues in
the Montage Knowledge Base.)
- Within a Montage
Use drag-and-drop to move Shortcuts around inside the
Montage Desktop
window. For more precise control, you may also use the cursor
keys or Position
settings in the Shortcut Properties dialog, or use the
Format menu to move and arrange multiple
Shortcuts in a single action.
Tip: Use the Miscellaneous,
Lock
Shortcut Position option to prevent accidental dragging of precisely
positioned Shortcuts.
- Into Montage
The quickest way to create a new Shortcut is to drag a file, folder, link,
or hyperlink from an Explorer
window into a Montage Desktop, or
drag a Shortcut from one montage into another. You can make any further adjustments to the new
Shortcut as necessary, via its Properties
dialog. (Alternatively, you could use the File,
New
Shortcut... command, which immediately opens the Properties dialog.)
The initial form of a new Shortcut's target
and starting directory path is governed by the
setting of the Advanced, Relative Paths
option.
- Files and Folders
If the drag source is a file or folder, e.g. from Windows
Explorer, its path becomes the new Shortcut's target,
and the title is just the file or
folder name without the path (except for root drive cases). When
the target is a document or executable file, the Shortcut's initial
directory is set to the target's containing directory.
- Links
When the source of the drag is a link, i.e. a Windows .LNK or .URL file,
Montage extracts some additional information in order to initialize the
new Shortcut. Instead of pointing to the link, Montage obtains the
link's target, and uses this as
the new Shortcut's target. The Shortcut's title, however, is taken
from the name of the link file. Additional properties obtained
from the link, if applicable, are used to initialize other Shortcut
properties, including arguments,
initial directory, and description.
- Hyperlinks
You can also create a new Shortcut by dragging a hyperlink into Montage,
e.g. from the contents of a web page or Internet
Explorer's address bar. In such cases, the Shortcut's
target is the URL, and the title
is just derived from the last portion of the URL.
Tip: Instead of dragging
a hyperlink directly into Montage, try dragging it first into the
Windows desktop, and then drag the resulting link from the Windows
desktop into Montage. This allows you to capture the web page
title or hyperlink text as the new Shortcut title.
- Out of Montage
When you drag and drop a Shortcut outside of its Desktop window, the effect depends on where you drop it
(i.e. the "drop target"). This behavior varies according to the
destination application, and not all applications will allow you to drag-and-drop into them. The cases where a drop is permitted generally
do one of two things: create an equivalent link, or open the Shortcut's
target with the designated application.
- Create a link
If the destination is a filing system Explorer
window or the Windows desktop, a new link
is created in the specified folder or on the desktop. Montage
copies various Shortcut properties into the corresponding link
properties, and this generally accomplishes what you'd expect.
However, since Montage supports a number of extensions over Windows'
native features, one should be aware that some of the original Shortcut
properties may be lost in the resulting link. For example, the
Shortcut's title may violate
Windows file naming restrictions, the description
may be longer than Windows supports, and Windows does not support relative
paths, dynamic
Shortcut properties or Montage's advanced
launching options.
- Open with
Dropping a Shortcut onto an executable program or a link to an
executable program will, for applications that support it, launch that program against the
document pointed to by the Shortcut. For example, you can see this
with the more recent versions of Paintbrush (MSPAINT.EXE) and Word (WINWORD.EXE).
Similarly, in some cases you can drop a Shortcut into an open
application window in order to navigate to the document specified as the
Shortcut's target. This behavior is especially useful in
conjunction with Internet
Explorer (IE).
Tip: Instead of launching
most of your Internet Shortcuts by opening them directly (e.g. via double-click),
just
use one or two primary IE Shortcuts to launch your preferred primary and
secondary IE window layouts. Then you can simply drag-and-drop URL
Shortcuts directly into an open IE window to navigate
to those pages. In this way Montage also serves as an alternative
method of organizing and using your personal "Favorites".
- Between separate instances of Montage
You can drag and drop a Shortcut from one
montage into another,
causing a copy of the original Shortcut to be created in the destination.
All of the source Shortcut properties are
carried over into the new Shortcut except for its position, which is
determined by where you drop it. This also copies some properties that have no Windows counterpart, i.e.
which cannot be represented in normal Windows
links. The form of the
target and
initial directory path specification in
the resulting Shortcut may not be identical to the original, however, as these
are governed by the setting of the Advanced, Relative Paths
option, and they may be further adjusted to account for differences between
the source and destination directory. Also note that any
dynamic Shortcut properties
in the source will have been evaluated before they are copied to the
destination, so they will no longer be dynamic expressions in the destination
Shortcut.
Every Shortcut has a corresponding graphical icon that is displayed in a
Desktop window. (For transparent
Shortcuts there is an associated icon, but it is not visible because it is
sized to 0 pixels.) The default icon size for standard Shortcuts is 32 X
32 pixels, but this can be adjusted to a different value (over a continuous
range, unlike Windows) for each montage. Montage automatically selects a
default icon when you create
a new Shortcut, and you can change the choice of icon via the Icon
specification in the Shortcut Properties dialog,
or with the Icon... command in the Shortcut
context menu. (The Icon, Reset Icon to Default
command restores Montage's default icon choice.) Supported image file types for Montage icons
include: .ANI, .BMP, .CUR, .DIB, .GIF, .ICO, and .JPG. The image
is scaled, if necessary, to fit into a 32-pixel square, or whatever
other default icon size has been specified for this montage.
Icons are not actually stored in Montage metafiles:
they are only referenced. Montage
extracts icons as needed from programs and other files residing on your
computer, and it stores these extracted icons in its icons
subdirectory. This directory serves as a
cache to speed up subsequent references, but
icons may be absent (or deliberately deleted,
e.g. via Clear Icon Cache),
forcing Montage to re-determine and obtain the icons it needs. If a
Shortcut's designated icon is found to be missing, it is automatically
re-initialized to an appropriate default icon. This dynamic icon initialization logic
allows montages to be compact, portable,
and distributable free of copyright restrictions.
In most cases, Montage will automatically find and extract the most
appropriate default icon for each Shortcut on your particular machine,
based on the Shortcut's target,
information from the Windows
Registry, and installed application programs. For
Shortcuts to image files, the global
Image
is Icon option causes a thumbnail of the target image itself to be
used as the default icon for each image, or the more selective Icon is Target option can be applied to individual Shortcuts. Otherwise, Montage uses one of the following built-in default
icons, which are located in the Montage
program directory.
-
 dynamic
Explorer icons dynamic
Explorer icons
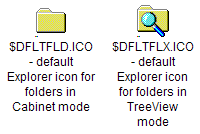
For Shortcuts to folders in the Windows filing system, Montage
supports a special dynamic icon, whose appearance corresponds to the
current TreeView
mode for an instance of Windows
Explorer. When the "magnifying glass" is
present, the Shortcut opens a split-paned Explorer
window (with TreeView of folder hierarchy at the left).
Montage's timer monitors this attribute while the target
Explorer
window is open, dynamically switching between the two built-in folder
icons according to whether the window is currently in TreeView or
"Cabinet" (single-pane) mode.
-
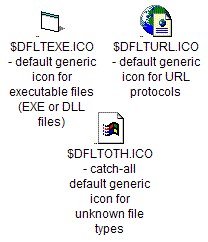 generic
default icons generic
default icons
When no
more specific determination can be made, Montage uses one of its
built-in generic icons.
-
 Montage
icon Montage
icon
This is the default icon that represents a Shortcut to another
montage, i.e. a file with the .MO3 extension.
-
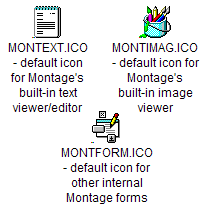 internal
form icons internal
form icons
These are the default icons for Montage's built-in
viewers and internal forms.
-
 invalid
or missing image icon invalid
or missing image icon
If the file designated as a Shortcut's icon is missing, or it exists but is invalid or not a
supported image file type, the icon displays as a grayed-out
box with a large X through it. Montage normally attempts to
supply an appropriate generic icon, even if the Shortcut's target is
missing, except in certain cases. When the target is missing,
but its extension indicates it is a supported image type, Montage displays
the missing image icon if the
global Image is Icon setting is
turned ON or if the Icon is Target option is
selected for this Shortcut. Also, if the
specified icon for this Shortcut is
missing but fetchable, the
missing image icon is used, rather than substituting a generic image
icon. This feature
is useful in connection with dynamic
Internet fetching, to provide a visible indication as to whether the
file has been downloaded yet.
|
|
Montage supports the following actions that can be performed by pressing
certain special keys, in addition to various main menu actions and their
corresponding hot keys.
- Deleting a Shortcut via the Delete key
Use the Delete key to remove the currently selected Shortcut from the Desktop. You will be prompted to confirm the deletion,
unless you hold down the Ctrl key when you press Delete, in which case the
prompt is bypassed. Alternatively, you can delete the current Shortcut
via File, Delete Shortcut from
the main menu, or the Delete Shortcut command
in the Shortcut's context menu.
- Editing a Shortcut's title
You can edit the title of a Shortcut in place, without using the title
field in the Shortcut
Properties dialog, by entering into edit mode.
Simply click the left mouse button on the title of an already selected
Shortcut, or use the Rename command of the
Shortcut context menu. When you finish typing into the space provided
for editing, e.g. by pressing Enter or clicking elsewhere, the title
automatically will be resized appropriately.
Tip: Turn off the global
Edit on Click option if you find this feature annoying, especially if there is
no separate icon to click on (i.e., for transparent
Shortcuts). This setting is assigned automatically (ON or OFF) when you select either the Standard
Style or Graphical Style
Montage options, respectively.
- Launching a Shortcut via the Enter key
Pressing the Enter key launches the selected Shortcut, producing the same
effect as double-clicking on it, or using File,
Open.
- Moving a Shortcut via cursor keys
Use the cursor keys (Up, Down, Left, Right) to move the currently selected
Shortcut one pixel at a time, or hold down the Shift key to move 10 pixels
at a time. You can also move a Shortcut by
dragging and dropping it with the mouse, or by adjusting the position
spinners in the Shortcut Properties dialog. Also see the
Format menu for commands and hot keys to
move and arrange entire columns and rows of Shortcuts in a single action.
- Resizing a Shortcut via Ctrl + cursor
keys
When a Shortcut is selected you can adjust its size by holding down the Ctrl
key and pressing one of the four cursor keys, to increase or reduce its
title width or height. When the Shortcut's Autosize
option is turned ON (the default), changes in width are in units of whole
words, delimited by spaces, and the title height is determined automatically.
Otherwise, when autosizing is OFF, changes to title height and width are made one pixel at a time.
Simultaneously holding down the Shift
key adjusts the size in 10 pixel increments, instead of 1 pixel increments.
Adjusting the height via cursor keys (with or without Shift) automatically turns off the Autosize
option. When adjusting the width (Ctrl + left or right arrow) without
Shift key, the Autosize setting is not changed, allowing you to continue adjusting the title
width in whole word increments. Resizing also can be done through various commands in the Title
submenu of the Shortcut context menu, or using the width
and height spinners on the Layout
page of the Shortcut Properties dialog.
Tip: The fastest way to
resize a Shortcut's title is to use Ctrl + left or right arrow without
the
Shift key, with autosizing turned ON. This immediately goes to the
next narrower or wider available format, breaking for line wrap at a
whole-word boundary. If desired, you can insert spaces into the title to
provide more choices of width. (With autosizing
enabled, you don't manipulate the height directly,
just the width.)
- Selecting the next or previous Shortcut via
Tab key
To cycle through Shortcuts in z-order,
use the Tab key, or Shift + Tab to go in reverse. Note that the
sequence of Shortcuts is not determined by their layout, but by the sequence
in which they were last selected. When you select a Shortcut, it is
brought to the front of the z-ordering. You can also send a Shortcut
to the back of the z-order by using the context menu, which is useful when
dealing with overlapping transparent
Shortcuts.
Differences between Montage Shortcuts and
Windows links
Although Montage Shortcuts are in many ways similar to Windows links (.LNK and .URL files), there are a number of differences.
The fundamental difference is that Windows links are separate files, whose
internal format is known to Windows, whereas any number of Montage Shortcuts may
reside within a single Montage metafile, whose
internal organization is understood by Montage, not Windows. The
differences in behavior between Montage Shortcuts and Windows links are as
follows:
- Each Montage Shortcut represents a particular instance and configuration of an
application.
A Windows link
stands for a disembodied program or
document, with no persistent connection to the application window that it
launches. On the other hand, a Montage Shortcut maintains an active
association to the particular
instance of the application
that it launches. Each Shortcut remains "aware" of the
state of its associated application
window, including window
sizing, placement, and whether it is currently open.
- Every Shortcut automatically saves and restores its
application window state.
Windows is inconsistent and heavy-handed in the way that it sizes and
positions the application window launched by double-clicking on a link.
The problem is that Windows, uses global, per-application defaults
(stored in the Windows
Registry), often resulting in a somewhat unpredictable or undesired
configuration when a link is closed and re-opened. On
the other hand, each Montage Shortcut keeps track of the layout of its own
application window (stored in the montage),
and the most recent window layout is automatically
restored when the
application is next launched through that Shortcut. Multiple Shortcuts
to the same target can be created,
each with its own distinctive window arrangement. Montage's modular,
fine-grained approach provides a more flexible and consistent way of launching applications,
without requiring you to waste time repeatedly rearranging windows.
- Open Shortcuts are detected,
tracked, and highlighted.
When a Montage Shortcut is open, it is highlighted by surrounding its
icon with a conspicuous red box (or other color for various
zoom
states). In Windows, you can only tell that a
link has been opened by finding a corresponding button in the Windows Task
Bar, or by recognizing the window itself. In any case, Windows does
not make it clear which link, options, or configuration were used to launch a given
application window. Montage also supports a unique auto-detection
feature, automatically highlighting certain types of Shortcuts if their target is known to be already open.
- Double-clicking an open Shortcut always activates its
associated application window.
Windows' behavior is not consistent when you double-click on a link
that has already been opened: sometimes it launches
another instance of the application, and sometimes it activates a
previous instance. Montage, on the other hand, consistently makes the
associated opening become the active
window when you double-click on an already-open (highlighted) Shortcut, rather
than launching an additional instance. This gives you a simpler, more
dependable way to control multiple instances and jump to a particular opening.
- You can close or control an open Shortcut from its highlighted icon.
Not only can you tell that a Shortcut is currently open, you can also
close it or manipulate its target
window directly from the Shortcut by right-clicking and using the Shortcut
context menu.
In Windows, you must first locate the target window by finding it on the screen,
or via the Windows Task Bar. Those methods are still available, but a Montage
Shortcut also adds capabilities not provided by any of the standard Windows
interfaces, for example sending
the associated target window to the back.
- Montage Shortcuts overcome
numerous restrictions and limitations of Windows links.
Because Windows shortcuts (links) are stored as files, they are subject to the
general naming restrictions of the Windows Shell
and filing system, i.e. they must avoid
the use of special characters and duplicate file names. Montage Shortcuts
are not so restricted in the text that can be used for their titles, and
they offer greater flexibility in the formatting and sizing of
individual Shortcut titles (contrasted to the rigid truncation rules of Windows
icon captions). Each Montage Shortcut can have its own,
customized title formatting. Montage also allows a continuous range of icon
sizes, and it supports a variety of standard image file types, not just ICO
files, for its scalable icons. In addition, Montage supports
much longer Shortcut
descriptions, more flexible Shortcut
tips, transparent Shortcuts,
dynamic Shortcut
properties, relative paths,
and additional portability
features not provided by Windows.
- Montage can automatically fetch missing files across the the
Internet
A Windows link requires that the target and icon specifications designate
existing files. Montage relaxes this restriction, with a unique dynamic
fetching mechanism that allows a Shortcut's
target and/or
icon to be automatically fetched across
the Internet, if missing. This capability enables Montage to serve as a
vehicle for efficient, secure distribution of content. For example, this
is the basis for distributing Montage
samples, on demand.
Shortcut Options context menu
Right-clicking on a Montage Shortcut brings up the Shortcut context
menu,
which presents the following commands and options pertaining to that Shortcut. (Menu options appearing in dark green apply only
when built-in viewers are enabled.)
- Open Target: opens the associated target, restoring its previous
configuration.
This launches the target application, as does double-clicking or pressing
the Enter key on the
Shortcut. (For Explorer cases, this opens a single-paned
Windows Explorer or Internet Explorer window.)
If the target Explorer window is already open in TreeView
mode, this closes it and reopens it in single-paned mode, with the
same window sizing and placement. Also see the File,
Open command.
- Explore Target: opens the target folder in a dual-paned Explorer window, with
TreeView at left.
(This command only applies to Shell Explorer cases
for which TreeView
mode is supported.)
If the target Explorer window is already open in single-paned mode, this
closes it and reopens it in TreeView
mode, i.e. with folders navigation pane at the left.
Tip: Double-click (or press
Enter) on a closed
Explorer Shortcut to accomplish the same thing as Open
Target or Explore Target, whichever one corresponds to its
previous TreeView mode.
- Activate Target: brings forward the already-open target
and makes it the active
window.
This menu option only appears when the Shortcut is already open, which you
can also tell from its highlighting.
Tip: Just double-click (or
press the Enter key) on a
highlighted Shortcut to activate its already-open target window.
- Close Target: closes the associated target window, retaining information about its final configuration.
Shortcut Properties are retained in the
corresponding Shortcut, but these
are not actually saved to the metafile until you
save the view or Save
Configuration for this Shortcut. If the target is
another montage, however, it will
implicitly save its own state upon
closing, in its own separate metafile. Also see File,
Close, View, Close
Children, and the Actions,
Close command of the global Shortcuts dialog to close all open
Shortcuts.
- Abandon Target: closes the associated target
viewer, without saving its configuration.
- Normalize Target: restores the target application window to its normal
zoom state.
This menu option only appears when the Shortcut is already open, as
indicated by its highlighting. If
the target window is currently minimized or maximized, this returns it to
the normal mode, and makes it the active
window. Also see View, Normalize
Children and the Actions,
Normalize command of the global Shortcuts dialog to normalize
all open Shortcuts.
- Minimize Target: zooms the target application window down to an icon on the Windows Taskbar.
This menu option only appears (disabled if already minimized) when the
Shortcut is already open. Also see View, Minimize
Children and the Actions,
Minimize command of the global Shortcuts dialog.
- Maximize Target: zooms the target application window to full-screen mode.
This menu option only appears (disabled if already maximized) when the
Shortcut is already open. When you maximize the target window, it
covers everything on the Windows desktop, except the Window Task Bar.
Also see the Actions,
Maximize command of the global Shortcuts dialog.
Tip: Use Send
Target to Back to put a maximized window behind everything else, except for any
icons on the Windows desktop.
- Send Target to Back: puts the target application window behind all other windows.
This menu option only appears when the Shortcut is already open. See INFO: how Montage determines the
sequence of state restoration steps for more about controlling the
window stacking sequence (z-order).
Also see View, Send
Children to Back and the Actions,
Send to Back command of the global Shortcuts dialog.
- Delete Shortcut: removes this Shortcut from the Montage Desktop.
If the Shortcut was open, this implicitly closes it, as well as its
Properties dialog (if that was open). You can also use the equivalent File,
Delete Shortcut command when the Shortcut is currently selected.
Also note that you can simply use the Delete
key to delete the current Shortcut. The Miscellaneous,
Clear
View command deletes all Shortcuts.
Tip: You can undo the
deletion of one or more Shortcuts simply by using View,
Restore
View, so long as you haven't yet saved the view
since the deletions were done.
- Fetch Missing Target: obtains the absent target file by fetching it from a known URL across the Internet.
This menu option only appears if the Shortcut's target
file is not found, but there exists a corresponding Internet
shortcut from which it
can be retrieved by dynamic
Internet fetching. If the global
Fetch On Demand option is enabled, you don't need to use explicit Fetch
Missing Target commands, because the fetch will be done automatically
when it's needed.
- Send Shortcut to Back: places this Shortcut behind all others (in case of overlap), and de-selects it.
In a graphical montage it can
be useful to create overlapping transparent
Shortcuts, for example where a larger region entirely covers one or more
sub-regions of the background image. Use Send Shortcut to Back to force
the larger Shortcut to the back of the z-order,
so that the underlying smaller Shortcuts also can be accessed.
Tip: Also try using Tab
or Shift+Tab to select a different Shortcut without having to use the
mouse.
- Properties: opens or activates this Shortcut's
Properties dialog, detailing various settings and options.
Each Shortcut has its own set of properties and a corresponding dialog for
viewing and changing them. If the Properties dialog is already open,
this command just activates that form.
- Title submenu -
options for the title (caption) of this Shortcut.
- Copy Title: places a copy of this Shortcut's title on the
Windows Clipboard.
- Autosize: toggles title
autosizing ON/OFF. (Embedded spaces enable automatic word wrapping.)
This option is enabled by default. You can still
adjust the width (within whole-word limits) when autosize is
checked, but the height will be determined automatically. Note
that autosizing is implicitly turned OFF when
you use Ctrl + cursor keys
to change the height of a Shortcut, but not if you change its width
(without the Shift key).
- Wider: increases title width (behavior
depends
on word wrapping and autosizing).
When Autosize is checked, this is a quick way to widen the title to the next available whole-word
width.
Tip: Also try using Ctrl
+ cursor keys to resize a Shortcut.
- Narrower: reduces title width (behavior depends on word
wrapping and autosizing).
When Autosize is checked, this is a quick way to narrow the
title to the next available whole-word width.
Tip: Insert spaces in
the title to permit more choices of width, since automatic word wrapping will
only break the line at spaces between words.
- Taller: increases title height by 10 pixels
(Available only when Autosize in OFF.)
When Autosize is checked, you can't change the title height
directly, because it is determined automatically.
- Shorter: reduces title height by 10 pixels (Available
only when Autosize in OFF.)
- Rename: edits the name of
this Shortcut, i.e. its title, in place.
Tip: Simply click on the selected Shortcut's
title to edit the title directly (if the global
Edit on Click option is enabled), or use the title
textbox in the resizable Shortcut Properties dialog if you need more
room.
- Icon submenu - options for the icon of this Shortcut.
- Copy Icon Path: places a copy of this Shortcut's
icon path (relative or absolute) on the Windows clipboard.
- Icon...: selects an image to use as the icon for
this Shortcut.
This is equivalent to pressing the Icon
button in the Shortcut Properties dialog. The
resulting icon path will be expressed as either a relative
path or an absolute path,
according to the current setting of the global Advanced,
Relative
Paths option for this
montage.
- Reset Icon to Default: resets the choice of icon for this Shortcut to the appropriate default.
Montage automatically determines a default icon
based on the Shortcut's target.
If you deliberately changed the icon, or if your Windows setup has
changed, this command re-determines the default, respecting the current
settings of the Advanced, Relative
Paths, Image is Icon, and
Pre-Fetch Icons
global options. Also see
Reset All Icons to Default for performing this operation across all Shortcuts in the
montage.
- Icon is Target: toggles whether to maintain this Shortcut's icon as the
target image file itself.
When this option is unchecked, a default icon
is automatically supplied, or you can specify a different icon
path via the Shortcut Properties dialog. Otherwise, when Icon
is Target is checked, the icon is taken to be the Shortcut's target
file, and there is no separately editable icon path specification
(the Icon path field in the Shortcut Properties becomes
read-only). If the target file happens to be missing or not a
valid image type, it is is displayed as an X-ed
out gray box. The default setting of this option is normally
OFF (unchecked), unless the global
Image is Icon setting is ON and the target appears to be a recognized
type of displayable image file. Bear in mind that displaying very
large images as scaled-down icons may cause a noticeable degradation of
performance, so this option should be used judiciously.
Tip: The Icon is Target
option can be useful in conjunction with dynamic
Internet fetching, to provide an immediate indication as to which
images have already been fetched, and which are still missing.
Also, using the Icon is Target option in combination with
Pre-Fetch Icons
mode, you can force fetchable
target file(s) to be automatically retrieved (if not already locally
present) as soon as the montage is opened, rather than deferring those
fetches until each such Shortcut is actually launched.
- Show URL for Fetching Icon:
displays the URL from which to fetch this Shortcut's icon.
The Internet address from which this Shortcut's icon can be retrieved is
displayed in a wait window.
(Click the mouse or press a key to close the message window.) This
command option is shown only if the icon is fetchable, i.e. if a
corresponding Internet
shortcut exists.
- Copy URL for Fetching Icon:
places a copy on the
Windows Clipboard
of the URL from which to fetch this Shortcut's icon.
Instead of displaying anything, this simply puts a copy of the icon's
original URL onto the clipboard, so you can then paste it into any
application. This command option only is displayed if the icon is fetchable.
- Fetch Icon from URL: retrieves this Shortcut's icon across the Internet, from the source whose URL is specified.
This command, shown only if the icon is fetchable, downloads a copy of the icon image file from its original source to
the designated local file path for this Shortcut's icon. If the
icon file already exists, it is replaced by a fresh copy, which may have
been obtained from Internet
Explorer's cache (unless you deliberately clear the
browser cache to
prevent this). A gray box with an X
will be displayed if the icon file is missing or invalid. Also see
the Icon is Target setting and the global
Pre-Fetch Icons
option.
- Internet submenu - actions relating to fetching the target of this Shortcut
from across the Internet.
(This submenu appears only if the Shortcut's target is fetchable.)
- Show URL for Fetching Target:
displays the URL from which to fetch this Shortcut's
target.
Displays the Internet address from which the target
of this Shortcut can be retrieved.
(Click mouse or press a key to close the message window.)
- Copy URL for Fetching Target:
places a copy on the
Windows Clipboard of the URL from which to fetch this Shortcut's target.
Puts a copy of the URL for fetching the target file onto the clipboard, so you can then paste
this text into any
application.
- Fetch Target from URL:
retrieves this Shortcut's target across the Internet, from the source whose URL is specified.
Downloads a copy of the target file from its original Internet address to
the designated local target file path for this
Shortcut. If the target file already exists, it is replaced by a fresh
copy. If the global Fetch on
Demand
option is enabled, a missing target automatically triggers dynamic
fetching when the Shortcut is opened, so you wouldn't normally issue
an explicit Fetch Target from URL command, unless you have reason
to think the original file may have been updated. (To be assured
of downloading the latest available version of a file, you should also
clear Internet Explorer's cache.)
- Miscellaneous submenu -
assorted Shortcut options and commands that are less frequently used.
- Copy Target Path: places a copy of
this Shortcut's target
path on the
Windows Clipboard.
This copies the absolute
path, after expanding any relative
path, environment
variables, or dynamic
Shortcut properties in the original target
specification.
- Refresh: re-determines and displays the latest properties and highlighting for this Shortcut.
Also see the global View, Refresh (F5)
command.
- Lock Shortcut Position: toggles
the option to prevent accidental movement of this Shortcut via drag-and-drop.
This setting is useful when dealing with transparent
Shortcuts that have been carefully positioned against a background image
in a graphical montage.
When the position of a Shortcut has been locked, you can't drag it within
its Montage Desktop by using the left mouse button, but you can still
move it by any of the other available mechanisms (move
via right-click drag-and drop, cursor keys,
or use the position setting in Shortcut
Properties), and you can still drag-and-drop it
outside of its montage, e.g. into Explorer.
- Save Configuration: saves the current
state of this individual Shortcut.
Permanently updates the record of this Shortcut's configuration in the metafile
for the Montage Desktop that contains
it. (If this Shortcut's
Properties dialog is open, its arrangement is also saved.) An individual Shortcut's complete state includes its placement
within the Desktop, various
settings that are displayed in the Properties dialog, and the
state of the associated external
application (including sizing, placement, zoom,
and whether
open). Saving the entire montage saves the configurations of
all of the Shortcuts it contains. Save
Configuration (for an individual Shortcut) only updates the portion
of the montage that pertains to this particular Shortcut.
Tip: Use Save
Configuration before experimenting on tricky changes to a Shortcut's
properties, so you can easily revert to the previous clean configuration
(via Restore Configuration) without
having to restore the entire view.
- Restore Configuration:
restores the last saved state of this individual Shortcut.
If the Shortcut is currently open (but not auto-detected)
this first closes it, and then its previous configuration is restored,
using information stored in the montage. (See Save Configuration for
more about the complete state of an individual Shortcut.) Use Restore
View to globally restore all Shortcuts.
- Disconnect: disassociates this Shortcut from its open external
application window.
Each Shortcut normally monitors a target
window that it has launched or auto-detected,
as indicated by the Shortcut's highlighting. When you Disconnect, the Shortcut relinquishes
its ownership or detection of the application window, leaving it open, but
behaving as if it hadn't been detected. (If you disconnect an
auto-detected Shortcut to another montage, the
built-in timer generally
will re-detect it shortly thereafter, i.e. it won't stay
disconnected unless you temporarily
turn
off auto-detection.) The Disconnect command is disabled if the target window is not currently
open.
Tip: Use Disconnect
if, for some reason, you wish to close the montage without closing one
of the applications you launched through it. Otherwise Montage
automatically will close all Shortcuts that it opened (but not those that
were auto-detected). Also you can globally
disconnect
all Shortcuts in a single command.
- Help about Shortcuts: displays help about Montage Shortcuts
(i.e. this page).
- Help for this Menu: goes directly to help about the
Montage
Shortcut context menu.
- Control submenu - generic Montage Control
Options submenu for advanced users.
Commands under this submenu apply to the Shortcut control
itself, which includes the state of the associated external
application window.