Montage Help Contents Montage Help

Global Shortcuts Dialog

Synch TOC | Unframe | Bottom

The global Shortcuts dialog controls various settings and performs actions that apply to all of the Shortcuts in this montage. (Compare with the Shortcut Properties dialog, which pertains to a single Shortcut.)  Actions and setting changes made through the Shortcuts dialog take immediate effect, but you can always revert your changes by restoring the last saved view.  The Shortcuts dialog supports What's This help, if Montage Help is installed.  Use View, Shortcuts... from the main menu, or the Shortcuts... command from the Montage Desktop context menu to invoke this dialog, which is divided into the following tabbed pages.

Shortcuts dialog - Actions pageActions Page

The command buttons on this page perform various actions against all open external application windows associated with this montage.  Additional options on this page pertain to auto-detection.

  • Normalize: zooms open Shortcut target windows to normal size.
    This command restores application windows to normal size and brings them to the foreground.  (Open Shortcuts are highlighted with a red border when their associated target window is in a "normal" state, i.e. not maximized or minimized.)  Also see View, Normalize Children, or use Normalize Target to normalize an individual Shortcut.

    Tip: Use Normalize to bring all of the associated application windows in front of this Desktop window.
     
  • Minimize: minimizes open Shortcut target windows.
    Shortcuts are highlighted in green when they are minimized.  Also see View, Minimize Children, or use Minimize Target to minimize an individual Shortcut.
     
  • Maximize: maximizes open Shortcut target windows.
    Shortcuts are highlighted in blue when they are maximized.  Use Maximize Target to maximize an individual Shortcut.
     
  • Send to Back: puts open Shortcut target windows behind all other windows.
    See INFO: how Montage determines the sequence of state restoration steps for more about controlling the window stacking sequence (z-order).  Also see View, Send Children to Back, or use Send Target to Back to operate on an individual Shortcut.
     
  • Close: closes open Shortcut target windows.
    Some applications, such as text editors, may prompt you to save changes before exiting.  Montage will generally trigger such confirmation dialogs, if applicable, and Montage will wait for your reply before continuing.  Also see View, Close Children, or use  Close Target to close an individual Shortcut.
     
  • Disconnect: breaks the connection to open target windows, without closing them.
    This causes Montage to regard Shortcuts as closed, even though their corresponding application windows may still be open.  While Shortcuts revert to the un-highlighted state, applications that were launched by this montage will remain open when the montage is closed, as opposed to the usual behavior of automatically closing associated children.  Use an individual Shortcut's Miscellaneous, Disconnect command to disconnect a single Shortcut.
     
  • Scope Options: you have the following two choices as to the scope of the preceding command buttons.
    This setting determines whether or not to include auto-detected Shortcuts, which were not opened directly through this montage.
     
    • Children: limits the scope of actions on this page to directly opened external Shortcuts.
    • All: includes auto-detected external Shortcuts in the scope of actions on this page.
       
  • Auto-Detect: automatically detect, monitor, and highlight Shortcuts to externally opened montages.
    This option enables or disables Montage's auto-detection feature within this instance of the program.  When Auto-Detect is turned ON (the default), a special mode of highlighting indicates any Shortcuts to montages that are already open.

Shortcuts dialog - Icons pageIcons Page

This page governs icon size and other global, icon-related settings that apply to this montage.

  • Preset Icon Sizes: you may choose one of the following standard icons sizes.
    Or else you can specify icon size directly (in pixels).
     
    • Very Large Icons: displays very large, 48-pixel square icons for all Shortcuts in this montage.
       
    • Large Icons: displays large, 32-pixel square icons for all Shortcuts in this montage.
      This is the default size for the Standard Style of montage.
       
    • Medium Icons: displays medium, 24-pixel square icons for all Shortcuts in this montage.
       
    • Small Icons: displays small, 16-pixel square icons for all Shortcuts in this montage.
       
    • No Icons: eliminates icons from all Shortcuts in this montage, leaving only their titles.
      This is the default size (0 pixels) for the Graphical Style of montage.
       
  • Size: width and height, of icons in this montage, in pixels.
    Enter a number or use the spinner to adjust the icon size to any value, including intermediate sizes.
     
  • Image is Icon: derives the default icon for image files from the target image itself.
    When this option is checked, newly created Shortcuts to image files will use the target as the icon, instead of supplying a generic default icon.  This applies only when the target file has one of the following extensions: .ANI, .BMP, .CUR, .DIB, .GIF, .ICO, or .JPG.  The target image is displayed as an icon, scaled automatically to the current icon size.  Although such scaled icons may appear small, the required processing for large image files can produce a noticeable degradation in performance, so this option should be used judiciously.  Also see the the Icon is Target option for individual Shortcuts.

    Tip: Try using Image is Icon to create a kind of "thumbnails" view of a collection of images, remembering that you can adjust the icon size on a per-montage basis.
     
  • Pre-Fetch Icons: fetches missing icons as soon as they are displayed, if URL is available.
    When this option is checked, missing icons will trigger dynamic Internet fetching as soon as they are displayed, if a corresponding Internet shortcut exists and Fetch on Demand is enabled.  Otherwise, when Pre-Fetch Icons is not checked (the default), missing but fetchable icons simply remain missing, appearing as x-ed out gray boxes.

    Tip: To create a montage that automatically fetches a collection of images (if any are missing) as soon as it is opened, try using a combination of Pre-Fetch Icons, Image is Icon, and Fetch on Demand.
     
  • Reset All Icons to Default: assigns default icons to all Shortcuts in this montage.
    This command re-determines the default icon to be used for each Shortcut, based on the current setting of the Image is Icon global option and any additional information required from the Windows Registry.  You may wish to use the Clear Icon Cache command before resetting icons to their defaults, if any icons appear to be outdated.  Also see the Reset Icon to Default context menu command for individual Shortcuts.
     
  • Clear Icon Cache: deletes .ICO files from Montage's icons subdirectory, to be re-obtained as needed.
    Montage looks in its own cache of previously extracted icons before trying to find them elsewhere.  If an icon was obtained from an earlier version of an application, and that program has since been updated, it may be necessary to delete the previous icon in order to display the latest version.  The Clear Icon Cache command simply deletes all of Montage's cached icons, ensuring that icons correspond to the currently installed version of their respective applications.

Shortcuts dialog - Style pageStyle Page

This page includes an assortment of Shortcut options, some of which also can be toggled from the main View menu, as well as various hot keys.  In addition, this page allows you to set the color of Shortcut titles and preview their appearance against two different background colors.

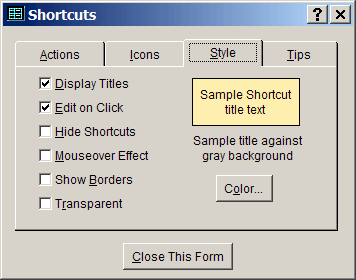
  • Display Titles: always show titles of Shortcuts, even when unselected.
    This option makes the titles of all Shortcuts visible or invisible.  When Display Titles is turned OFF, the title is displayed only for the currently selected Shortcut, if any.  Also, when the Mouseover Effect is enabled, hidden Shortcut titles appear as the mouse hovers over them.  This option also can be toggled by the View, Display Titles command (Shift+F2).

    Tip: Use hidden titles in a graphical montage to go into "quiz mode", where the title appears only when you click on or hover the mouse over a Shortcut.
     
  • Edit on Click: enters editing mode when a selected Shortcut title is clicked.
    In the default Standard Style of montage, clicking on the title of an already-selected Shortcut allows you to edit the title, in place, as in Windows Explorer.  Especially with Montage's Graphical Style, or simply as a matter of preference, you may wish to turn OFF this option, to disable the usual edit-on-click behavior.  In either case, you can also use the Title, Rename command in the Shortcut context menu to accomplish the same thing, or you can edit a title through the Shortcut Properties dialog.
     
  • Hide Shortcuts: makes all Shortcuts invisible, for unobstructed view of wallpaper.
    When Shortcuts are completely hidden, they disappear from the Desktop, but they can be made visible again without any loss of information.  This option also can be toggled by the View, Hide Shortcuts command (F4).
     
  • Mouseover Effect: shows otherwise hidden titles and borders around Shortcuts as the mouse passes over them.
    When the Show Borders option is OFF, the Mouseover Effect displays a thin (1 pixel) border around each un-highlighted Shortcut as the mouse passes over it.  Likewise, when Display Titles is OFF, the Mouseover Effect causes Shortcut titles to be displayed only as the mouse passes over them.  This feature is particularly useful in connection with graphical montages, as a way of creating easily detected "hot spots" on the background image (wallpaper) without detracting from an unobstructed view of the underlying graphic.  The color of the border that appears as the mouseover occurs is the user-selectable Shortcut color.  This is one of a group of options that can be set collectively by choosing either Standard Style or Graphical Style, and this option also can be toggled by the View, Mouseover Effect command (Shift+F4).
     
  • Show Borders: displays a thin border around closed Shortcuts.
    When this option is unchecked (the default), Montage does not display a border around closed Shortcuts, except as an optional mouseover effect.  Otherwise, if Show Borders is turned ON, each closed Shortcut is surrounded by a thin (1 pixel) border, in the user-selectable Shortcut color.  In any case, the Show Borders setting only pertains to closed Shortcuts, and open Shortcuts always use Montage's standard colored border highlighting scheme.  This option also can be toggled by the View, Show Borders command (F2).

    Tip: It may be more convenient to initially lay out a graphical montage with Show Borders ON, and then turn Show Borders OFF to enable mouse-over effects after completing the layout.
     
  • Transparent: uses only transparent Shortcut highlighting modes, to keep wallpaper visible.
    The Standard Style of montage employs some highlighting effects, specifically those for selection and auto-detection, that use an opaque (non-transparent) background scheme.  The Transparent option, which is the default for Graphical Style, avoids these opaque effects, instead using an alternative highlighting scheme that doesn't obscure the wallpaper.
     
  • Sample Shortcut title text: displays an example of title against the current Desktop background color.
     
  • Sample title against gray background: displays an example of a title against a gray background.
    Unless you are in Transparent mode, this illustrates the highlighting of auto-detected Shortcuts.
     
  • Color...: picks a color for Shortcut titles and closed-state borders (if visible).
    The default color of Shortcut titles and borders (if displaying closed Shortcut borders) is black, which stands out clearly against the default white background of a Montage Desktop.  This option presents a color-picker dialog that allows you to choose a different color, to contrast against your choice of background color or wallpaper.

Shortcuts dialog - Tips pageTips Page

This page contains various options related to the automatic display of Shortcut tips.  All of the following toggle options are enabled by default.

  • Status Bar Tips: displays Shortcut tips in the status bar, at bottom of window.
     
  • Wait Window Tips: displays Shortcut tips in a small "wait" window near the mouse pointer.
    The wait window can display multiple lines of text, but only up to 254 characters (ellipsis indicates truncation).
     
  • Show Description: displays a Shortcut's description (if non-blank) as its tip.
    The description can be of virtually any length, but no more than the first 254 chars are displayed in the Shortcut's tip.
     
  • Show Target Info: display Shortcut's target info as its tip. (Description takes precedence, if enabled.)
    The arguments and initial directory are also displayed, space permitting.

    Tip: To combine the basic target information with the description (without manually re-entering it) enter a "++" at the start or the end of the description.  The "++" will be expanded automatically into the target information, displayed before or after the rest of the Shortcut description.
     
  • Delay Time: number of seconds delay before Shortcut tip is displayed (0 = never).
    The Shortcut tip delay, which defaults to .4 seconds, is one of the parameters used by Montage's built-in timer.  The delay is the period of time that the mouse must remain stationary before the tip is displayed.  Setting the Shortcut tip delay time to <= 0 disables automatic display of Shortcut tips.

Close This Form: exits from this form, returning to the Montage Desktop window.
At the bottom of the Shortcuts dialog, visible from any page, the Close This Form pushbutton is equivalent to the form window's close box.  You may, however, perform other Montage actions while the Shortcuts dialog is open, because this form is modeless.

Synch TOC

Next: Menus

 Unframe | Top


Montage Help page, last edited: 12/31/10 16:20
http://ideaxchg.com/montage/help/globalshortcuts.htm
Copyright © SpaceTime Systems 2003-2011