|
The About Montage dialog is accessible through Help,
About Montage in the main menu or More,
Help, About
Montage in the Desktop context menu. This is a
modeless, resizable form
that displays
the executing program path and version, the current Montage metafile
location, size, timestamp, and version,
plus additional information about your system configuration and selected
runtime libraries. The View, Refresh
(F5) command causes this information to be recalculated. Additional details about your
Windows configuration can be
obtained by clicking on the fox icon image. Clicking on the Montage
icon image at the upper left navigates a browser window to the
Montage home page on the World Wide Web, like the menu command Help,
Montage on the Web.
The four pushbuttons perform the following actions:
- OK: closes the About Montage dialog.
(Pressing the Esc key also closes this dialog.)
- Samples: launches the main
sample montage.
This is equivalent to Help, Samples from
the main menu.
- Buy: opens a browser window to purchase SpaceTime Systems
products securely online.
This is equivalent to the Help, Buy
Online menu command.
- Register:
specifies
registered user credentials for
accessing password protected web sites.
Equivalent to Help, Register, this command activates the
Registration /
Authentication dialog, enabling you to download content that is
restricted to registered subscribers.
Tip: Right-click on the
scrollable text region and select "Copy All" to copy the full text onto
the Windows Clipboard.
|
|
|
|
This
modeless dialog displays information about your credentials for accessing
password protected web sites through Montage. Enter your username and
password here to enable access to
Montage samples that are restricted to registered
subscribers (see below about Montage
registration in particular). You can activate this dialog from the main menu
Help,
Register command, or via the Register pushbutton of the
About Montage dialog. Aside from providing
access to Montage samples, this facility supports
dynamic fetching from
any password-protected web sites that use
basic access authentication.
Thus other publishers also can use Montage as a vehicle for distributing any
kind of premium content
to a restricted audience, simply by assigning usernames and passwords to authorized
users.
- Authentication table:
the full path to the
encrypted table of authentication data being used and shown in this
form is displayed in the
grayed out text box at the top of the dialog. This table is
created automatically if it doesn't already exist, and Montage supports
a number of configuration options for determining the table's name and location.
Below the upper, read-only text box, a grid displays the contents of the authentication
table, which may contain multiple rows corresponding to various different web
sites. The table may be empty, in which case you would use the Add
button to create a first entry. If there are multiple rows, you can
use the up/down cursor keys or the mouse to select the desired row in the grid, and click the Edit button to modify that
entry.
- URL: a web site address or a pattern,
which may include "*" and "?" wild card characters.
This specifies the web site or sub-section of a web site to which the associated
username and password apply. The "*" (asterisk) wild card stands for any
number of characters (0 or more), and the "?" (question mark) stands for any
single (exactly 1) character. When Montage attempts to
dynamically fetch a password protected page or file from the Internet, it looks for the
first matching URL pattern in the authentication table (in the sequence
listed), and this entry determines the authentication credentials that Montage
passes to the web server. If no matching URL pattern is found, an error
message reports that you are not authorized to access this site.
Tip:
To register for access to subscriber-only Montage downloads, you can use
the URL pattern "http://*ideaxchg.com/*", as illustrated in the screen shot above.
The initial asterisk in this pattern assures that this entry applies,
whether or not a given URL includes a "www." prefix or other subdomain
specification. The final asterisk is needed to make this entry
applicable to all pages in the IdeaXchg web site, not just the home page
(root). Constructed in this manner, a single entry in the authentication
table covers the entire web site. If different credentials were needed
for different portions of the web site, one would create multiple entries,
with different URL patterns for each username/password combination.
- Username: the registered user name or
identification required for access to this web site.
This is generally case sensitive, assigned to you by the administrator of the web site
in question.
- Password: the registered password required for
access to this web site by this user.
This is generally case sensitive, possibly containing non-alphanumeric
characters, as assigned to you by the administrator of the web site. A mask of asterisks ("*" characters) is displayed
when the password is entered or displayed in this field, as an additional
security measure.
- Add: appends a blank record, so you can specify
credentials for another web site.
This automatically enters into editing mode, if previously in read-only mode.
- Edit/Done: enables modification of
authentication data, or exits from editing to read-only mode.
In the initial read-only mode, clicking on the Edit button enters
editing mode, which allows you to modify the values of URL, Username, and
Password fields. In editing mode, this button's caption turns to "Done",
and clicking on it returns the dialog to read-only mode.
- Delete/Undelete: marks this record as
logically deleted, so it won't be used, or undoes such a deletion.
You can temporarily delete a row from the authentication table, causing it to
be ignored while it is logically deleted, as indicated by the presence of a
deletion marker (a solid black box in the leftmost column). When the
current row is marked as logically deleted, the Delete button
caption turns to "Undelete", and clicking on this button removes the deletion
mark, returning the button caption to "Delete". You can also toggle a
deletion simply by clicking directly upon this marker within the grid.
- Pack: packs the table of authentication data,
permanently removing any records marked as deleted.
Use this to remove unwanted clutter, i.e. logically deleted records that are
of no further interest.
- Close: exits from the Registration /
Authentication dialog.
Closing the dialog automatically terminates editing mode. (Pressing the
Esc key also closes this dialog.)
|
|
|
|
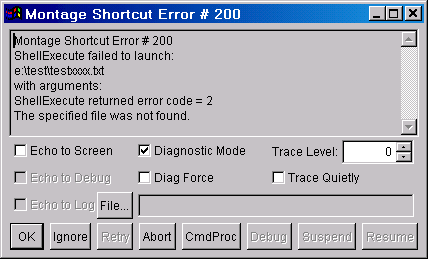
This form is used for both error reporting and for displaying various types
of informational messages. The dialog is resizable, and you can scroll
through the full message text if it is too long to fit in the visible
area. Also you can select and copy any portion of the message text to the Clipboard.
After reviewing the message, close the dialog by clicking on the OK button
or clicking on the form's close box. The other pushbuttons and options are
intended primarily as an aid to developers.
When Montage encounters an error, it displays a
detailed error message in this type of dialog, with a title indicating some
specific error number. The title is repeated in the scrollable message
text, so you can easily capture all of this information and paste it into any
sort of document, e.g. an email or text
file. For routine errors, you would simply note the information and click OK. However, if an error occurs while initially opening a montage,
clicking OK causes the entire opening to fail, even though the error
might have affected only a single Shortcut.
In such cases, you may wish to choose "Ignore", instead of
"OK", so that the failure is confined to just that Shortcut, and the
rest of the opening is allowed to proceed normally. Choosing
"Abort" is a more drastic measure (seldom used), which causes the
offending object to terminate itself immediately.
Aside from reporting errors, the Diagnostic Message dialog also
displays warning messages and output from various commands. For
example,
selecting the "Diagnostics..." command from any of a number of menus,
e.g. Tools, Diagnostics..., shows
information about a specific internal object,
such as an individual Shortcut or the whole Montage
Desktop. Tools,
Analyze is another command that uses the Diagnostic Message dialog to
display its results. Although this modal dialog is a type of
internal form, it
actually resides on the Windows desktop, outside of the Montage Desktop window.
Closing the Diagnostic Message dialog allows you to proceed further.
Tip: Right-click on the
read-only message display area to invoke an editing context
menu, so you can easily copy the message text to the Clipboard.
|
|
|
|
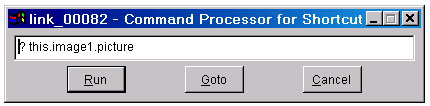
Montage controls, forms, and
the Desktop each can have an associated
Command
Processor window, and any number of these may be open at the same time. The Command Processor is a modeless, resizable form
residing in the Montage Desktop window, with a textbox into which you can type a single
Visual FoxPro (VFP) command line. Optionally, the state
of every Command Processor window is automatically saved and
restored along with the rest of the montage, but this is done only
if the Advanced, Save Command
Processors option is turned ON (it is OFF by default, to reduce metafile
size).
Command Processor windows
can be opened through a number of menus (e.g. Tools,
Command Processor), and
also via the CmdProc button in the Diagnostic Message
dialog. This facility is strictly for advanced usage, e.g. for
testing and debugging. (Most users should never use the
Montage Command Processor unless instructed to do so.)
The three pushbuttons perform the following actions:
- Run: executes the specified
Visual FoxPro command line in the textbox above.
The VFP command line is executed (by dynamic macro expansion), from the context of
a method in the associated object
for this Command Processor instance. The significance of the
context is that it allows you to refer directly to the object as
"THIS", as illustrated in the sample screen shot above. (You can
also refer to the containing form as "THISFORM", but that is less
likely to be useful.) Any
screen output, by default, is directed to the background of the Montage Desktop window.
- Goto: activates or sets the focus
to the object
associated with this Command Processor dialog.
Since there is no relationship between the placement of the Command
Processor dialog and its associated object, the Goto button provides a
convenient way to see this connection.
- Cancel: closes the Command Processor dialog without executing the
specified command line.
Exiting from the dialog in this manner saves the dialog layout and command
line, at least during the current Montage session. However, if you
terminate the dialog instead by clicking on its close box (in the window
title bar), changes to the dialog's placement and command line are not
saved. In any case, persistent retention of Command Processor states
across multiple sessions, i.e. after closing and reopening the montage, is
done only if the Advanced,
Save Command
Processors option is turned ON.
|
|
|
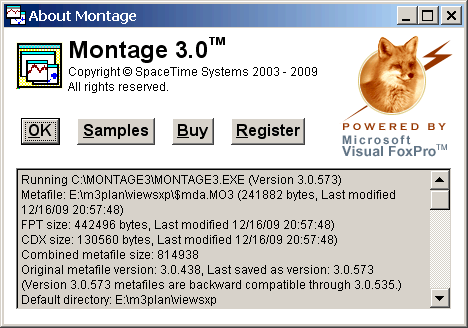 About
Montage dialog
About
Montage dialog